Hardwood Flooring Installation: What You Need to Know Before You Start
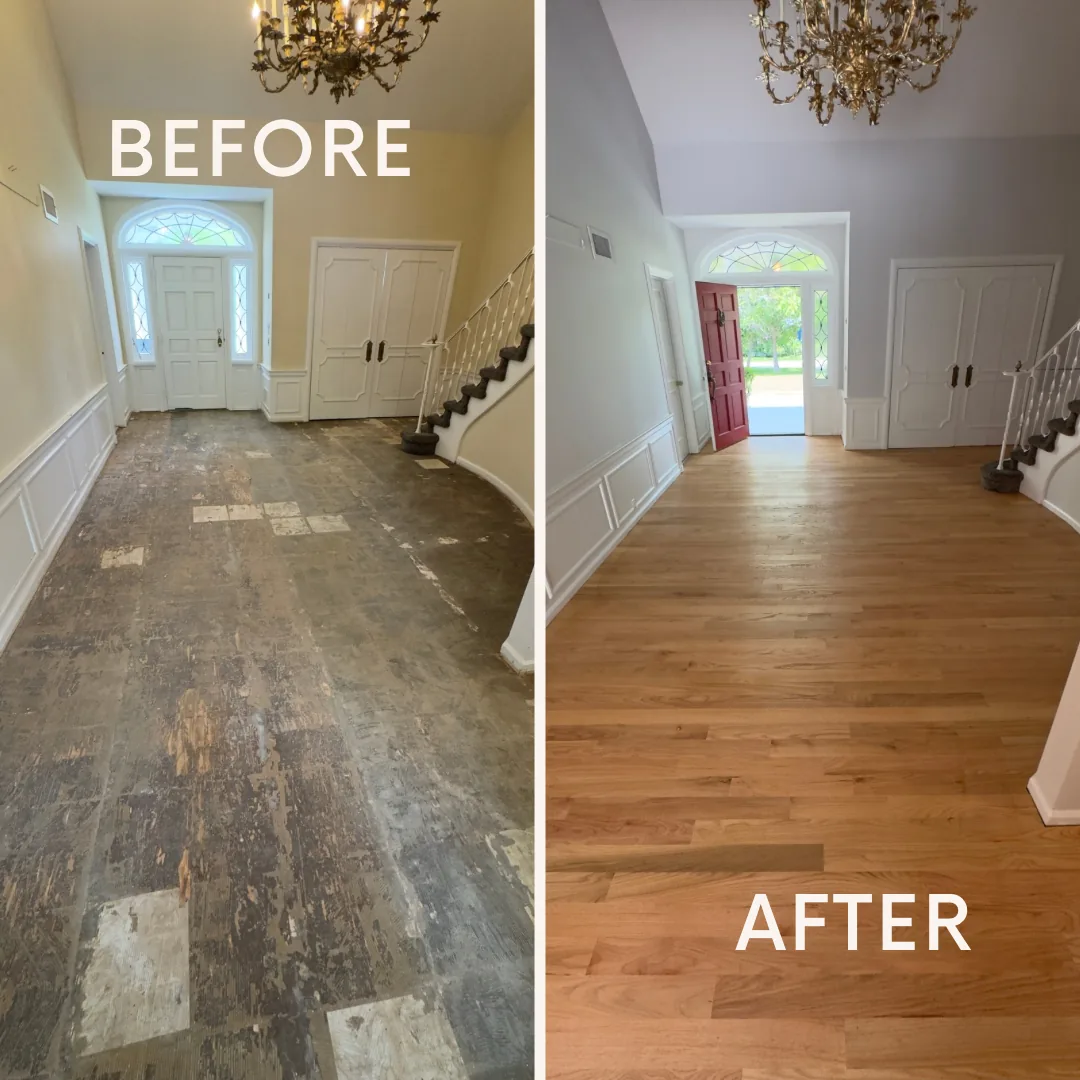
That floor was finished. Concrete patches where old tiles had been ripped out years ago. The original finish — gone. Wood underneath peeling in sections. A grand foyer with high ceilings, a curved staircase, and an iron chandelier overhead — and the floor looked like a job site that never got cleaned up.
The homeowner had been living with it too long. They called us. We pulled everything out, prepped the subfloor right, and installed new hardwood strip flooring from scratch. Here’s the full breakdown — the spec, the process, and what every homeowner should understand before committing to hardwood flooring installation.
What Hardwood Flooring Installation Actually Involves
Most people think hardwood flooring installation is about the wood. It’s not. The wood is maybe 40% of the job. The other 60% is everything underneath it and everything that happens before a single board goes down.
The sequence matters. Skip a step — or rush it — and the floor tells you later. Boards that cup. Gaps that open in winter. Squeaks that weren’t there on day one. Every one of those problems traces back to something that happened before installation, not during it.
Here’s what proper hardwood flooring installation looks like, in order:
| Step | What It Is | Why It Can’t Be Skipped |
|---|---|---|
| 1. Subfloor assessment | Check flatness, structural integrity, moisture levels | An uneven or wet subfloor destroys a hardwood floor from below |
| 2. Subfloor prep | Level, patch, clean, treat for moisture if needed | Hardwood telegraphs every imperfection underneath it |
| 3. Wood acclimation | Store flooring in the space for 3–5 days minimum | Hardwood equalizes to room moisture — install before it does and it moves after |
| 4. Layout planning | Determine direction, starting wall, pattern | Direction affects how the room reads visually and how the floor performs |
| 5. Installation | Nail-down tongue & groove, board by board | Each piece locks the next — sequence and fastening pattern matter |
| 6. Finishing | Sand, stain (if desired), seal with polyurethane | Finish protects the wood and determines final appearance |
The Wood We Chose — And Why
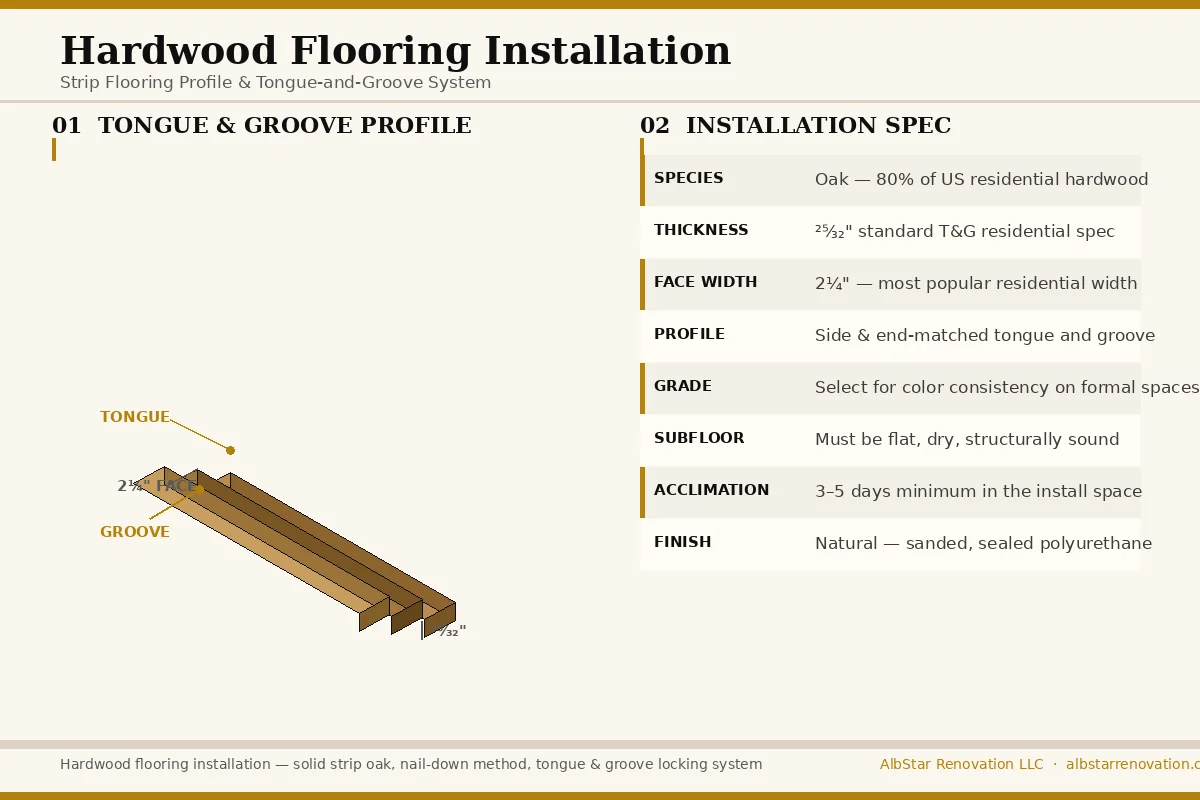
For this job, we used solid oak strip flooring — 25/32″ thick, 2¼” face width, tongue and grooved on all four sides. That’s the standard residential spec, and there’s a reason it’s standard: it works. Oak constitutes roughly 80% of all residential hardwood flooring installed in the United States. Not because it’s cheap, but because it’s the right balance of hardness, stability, workability, and appearance.
Strip flooring specifically — boards cut in narrow widths with tongue and groove profiles — locks together at every joint. Each piece is machined so the tongue of one board fits into the groove of the next on both the long sides and the ends. The result is a floor that moves as a single surface, not as individual boards.
The thinner strips are used chiefly in remodeling — when new floor is laid over old and it’s not desirable to reduce room height by using thick, more expensive flooring. For a full replacement like this job, we went with the full 25/32″ spec. No compromise on thickness.
Strip Flooring Sizes — What the Numbers Mean
Hardwood strip flooring comes in a range of sizes. Understanding them helps you make the right call for your space.
| Spec | Common Options | What We Used |
|---|---|---|
| Thickness (T&G) | ½”, ³⁄₈”, ²⁵⁄₃₂” | ²⁵⁄₃₂” — full residential spec |
| Face Width | 1½”, 2″, 2¼”, 3¼” | 2¼” — most popular residential width |
| Profile | Square-edge, Side-matched, Side & End-matched | Side & end-matched — locks in all directions |
| Species | Oak, Maple, Beech, Birch, Pecan | Oak — most stable, most available, most proven |
Hardwood Grade: What It Means for Your Floor
Grade is one of the most misunderstood parts of hardwood flooring installation. Homeowners assume a higher grade means stronger wood. It doesn’t. Every standard grade of hardwood strip flooring meets the same structural and durability requirements. Grade is about appearance only.
For oak, grades run from Clear — minimal knots, tight and consistent color — down to No. 2 Common, which carries more natural character: visible knots, color streaks, pin holes, and grain variation. Neither is inferior as a floor. They’re just different looks.
Higher grades also tend to run longer strip lengths, which affects how the floor reads across a large room. For a formal foyer where you want the eye to travel the full length of the space without interruption, we selected for color consistency. The result is a floor that reads as a single continuous surface — not a collection of individual boards with competing personalities.
No two hardwood floors are exactly alike. Each has its own grain pattern, its own character. That individuality is what you’re paying for when you choose real wood over vinyl or engineered product. This floor earned its character the hard way — it replaced one that had completely given up.
Why Solid Hardwood — Not Engineered, Not LVP
Engineered flooring and luxury vinyl plank both have legitimate use cases. Engineered hardwood handles moisture and subfloor variation better than solid wood. LVP is nearly indestructible and fully waterproof. For the right application, either can be the right call.
But for a wood subfloor in a controlled interior environment — a foyer, a living room, a bedroom — solid hardwood strip flooring is still the superior long-term investment. Here’s why: it can be sanded and refinished. Multiple times. A properly installed solid hardwood floor at 25/32″ thickness has enough material above the tongue to be refinished 4–5 times over its life. That’s 60–80 years of floor from a single installation, if it’s maintained.
LVP cannot be refinished. Engineered flooring can handle one or two light refinishes at best. When they’re done, they’re done. Solid hardwood is the only flooring material where the word “restoration” is genuinely on the table decades later.
The Result
Look at the photo. That’s not a filter. That’s what happens when hardwood flooring installation is done correctly — right species, right spec, right subfloor prep, right finish. The chandelier was always there. The curved staircase was always there. The arched door was always there. The floor was the one thing making the whole entrance look wrong.
They didn’t renovate the foyer. They fixed the floor. The house looks like a completely different place.
Ready to Talk About Your Floors?
We’ll come out, assess what you’ve got — subfloor, existing material, the whole picture — and give you a straight answer on what hardwood flooring installation actually makes sense for your home. No pitch. Just facts and a number.
(646) 645-4577 — Free EstimateAlbStar Renovation LLC · 65 Bajart Pl, Yonkers, NY 10705 · albstarrenovation.com
Leave a Reply